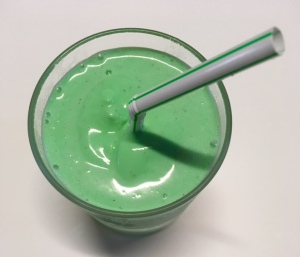
Tomorrow is St.Paddy’s Day where we all get to wear something green, eat yummy food, hope we find the rich leprechaun at the end of a rainbow, and of course the big kids get to have a drink to celebrate the Irish.
This year I decided to make a simple but delicious milkshake — it has just a hint of booze but not overpowering, and of course the best part is it’s green!
Hope you enjoy it as much as I had fun experimenting while creating the recipe. Cheers!
INGREDIENTS
1 ½ cups french vanilla ice cream, packed firmly
1 tablespoon milk
¾ ounce whiskey
½ ounce peppermint schnapps
¼ teaspoon green food coloring (about 10-12 drops)
DIRECTIONS
Put all ingredients in a blender and puree until smooth and creamy. Serve immediately.
It’s Valentine’s Day — a day set aside to show extra love to your significant other. Maybe you’re taking that special someone out to dinner or better yet, preparing them a home cooked meal where you can just relax and enjoy each other’s company without the bustle of a busy restaurant.
Instead of creating a new dish, I chose to fancy up a glass of champagne to toast your evening at home. So, rather than breaking out those flute glasses and just pouring a glass of plain ol’ bubbly, try this tipsy mimosa as you toast to your better half.
Happy Valentine’s Day and live zestier.
INGREDIENTS
2 3/4 ounces champagne (brut recommended)
1 1/4 ounce orange juice
1/4 ounce Grand Marnier
Garnish: twist of orange peel
DIRECTIONS
Very simply, add the ingredients to your champagne flutes (or wine glasses if you don’t have any) then slowly top with champagne. Mix gently and enjoy.
Pro tip: I, personally, purchased tiny (airplane-size) bottles of liquor for the Grand Marnier to reduce the cost.
Sunday is the Super Bowl and it promises to be one heck of a game between the Falcons and the Patriots. As a diehard Packers’ fan, you can imagine how heartbroken I am that my boys aren’t in Sunday’s game, so I did what I do best, and I got to making a new recipe.
We all like snack-size bites for the big game and a 7-layer dip of some sort is quite popular. I took that concept and made it my own spin.
Enjoy and live zestier.
INGREDIENTS:
1-16 ounce can refried beans
1 package wonton wrappers
⅓ cup sour cream
1 teaspoon cumin
½ teaspoon paprika
½ teaspoon chili powder
Salt
Black pepper
Guacamole, your favorite recipe
Salsa, your favorite recipe
Black olives
Jalapeños or green onions
Cheddar cheese
DIRECTIONS:
Preheat oven to 350 Fahrenheit.
Spray a muffin tin with nonstick spray and gently press a wonton wrapper into each cup. Spread a thin layer of refried beans and sprinkle cheese on top; add another wonton wrapper. Gently press down. Put another thin layer of cheese on top. Bake for 9-11 minutes or until edges are golden brown (resembling tortilla chips almost — the bottom will be soft).
Mix cumin, paprika, chili powder, pinch of salt and pinch of pepper in a medium bowl and add sour cream; stir. Refrigerate.
Layer guacamole, salsa, olives, zesty sour cream , jalapeños (or green onions if you don’t like too much spice) on to of the baked wontons when they come out of the oven.
I grew up in SoCal and am new to Eureka, so being in the middle of all the redwoods and experiencing all this rain is a new experience for me. But it’s awesome to experience this one month into fall, which is my favorite time of the year.
Fall is a soothing season to me because nature is changing its colors into golden oranges, yellows and reds. The high temperatures of the previous season have finally tempered down (I’ve lived in hot cities across the country) so I get to go play in the kitchen and create soups, chilis, sauces and everything in between for my cookbook. Oh, and football season is underway so my vocal chords are in full swing for my boys — the Green Bay Packers.
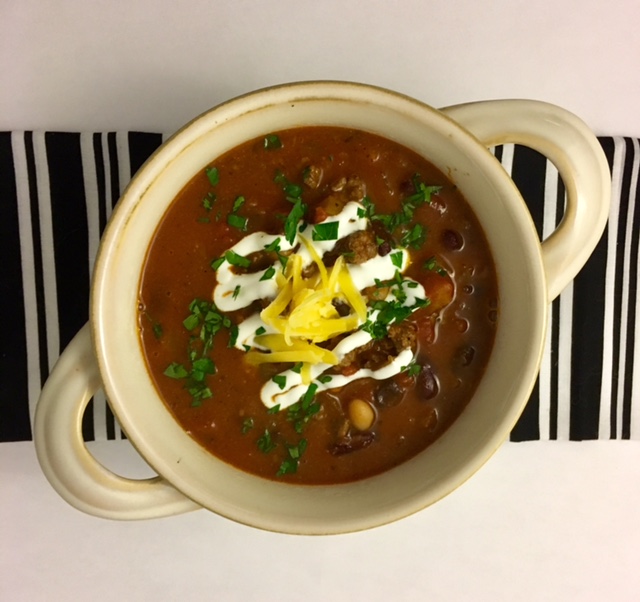
One of the things I found very quickly when I moved here were the local farmer’s markets that could easily inspire me on a weekly basis. I’m working on combining those local flavors into my recipes. For chili con zesty, I incorporated local vegetables, as well a local beer.
The chili has an enticing aroma as it simmers and as fills your kitchen, you’ll become excited with anticipation for that warm bowl once it’s finished cooking. The color is a rich, deep red that draws you in and with each bite, you’ll be filled with veggies, meat, beans and hearty tomatoes. The layers of flavors will leave you wanting another spoonful as you’re digging in with just enough kick to each bite because of the spice blends I use, but not an overpowering heat wave that will overtake your pallet. The beer and tomatoes blend well together with the flavors and to temper it down at the end, add a dollop of sour cream. One of the best parts (in my opinion), is that even though there is beer in the recipe, it can be paired with either your favorite beer at the end or even a nice glass of merlot, cabernet or a smooth red blend — my aunt (and dedicated taste-tester) said a glass of red blend complements the chili perfectly.
I hope you enjoy this chili as much as I enjoyed creating this recipe. Live zestier.
ChiliConZesty
INGREDIENTS:
1 pound ground beef
1 12-fluid ounce bottle Lost Coast Great White (Corona or Heineken work as well)
3 14.5-ounce cans petite diced tomatoes
1 15-ounce can tomato sauce
1 6-ounce can tomato sauce
1 15.25-ounce can kidney beans (50% less sodium if possible)
1 15.25-ounce can white beans (50% less sodium if possible)
1 15-ounce can black beans
1 4-ounce can mild green chilies
1½ cups water
1 large sweet (or yellow) onion, diced small
1 large orange (or red) bell pepper, diced small
2 large carrots (about ½ cup), diced small
2-3 medium jalapeños, one seeded and minced, one seeded and cut in half (the other is optional for those of you who likes chili extra spicy — seed and mince)
3 garlic cloves, minced
3 tablespoons + 1 teaspoon chili powder
2 tablespoons Worcestershire sauce
1 tablespoon + 1 teaspoon cumin
1½ tablespoons extra virgin olive oil
2½ teaspoons paprika
2½ teaspoons dry basil
2 teaspoons garlic powder
1 teaspoons onion powder
1½ teaspoons black pepper (plus extra ¼ teaspoon for seasoning for meat)
¾ teaspoon salt (plus extra ½ teaspoon for seasoning for meat and onions)
DIRECTIONS:
In a skillet, cook the ground beef and season with ¼ teaspoon of salt and pepper; drain fat and set aside.
In a large soup pot, on medium-low heat, drizzle the olive oil on the bottom and cook diced onions with ¼ teaspoon of salt until translucent (about five minutes). Add diced bell peppers and carrots and continue to cook for an additional five minutes (carrots will be al dente). Add minced garlic, can of chilies and one fresh minced jalapeños (adjust less or more per your desired spice-level — use only half of a jalapeño for those who don’t want too spicy (keep in mind the seasonings will have a kick) and use the entire jalapeño for those who want it extra spicy); stir. Slowly, stir in beer (bring heat to medium-high), bring to boil.
Rinse all beans before adding to the vegetable and beer mixture. Add cooked ground beef, cans of tomatoes, tomato sauces, 1 cup of water, halved jalapeño, Worcestershire sauce, chili powder, cumin, paprika, dry basil, garlic powder, onion powder, 1½ teaspoons black pepper and ¾ teaspoon salt; bring to boil.
Lower heat to medium-low and simmer chili for 50 minutes, stirring occasionally — halfway add the last ½ cup of water, additional ¼ cup if chili consistency is too thick. Pull out halved jalapeño skins and discard.
Serve with cheesy bread or tortilla chips.
Suggested toppings: Sour cream, cheddar cheese, chives and roughly chopped cilantro or parsley.
My favorite season is fall. The leaves are changing to reds, oranges and yellows so taking random weekend drives are even more gorgeous than any other time of the year. Finally, the weather is cooling down when you’re living in hot climates, which I’ve done as an adult (not fun). And my cats finally stop shedding, so that’s a bonus.
But as a chef, the ultimate reason why I love the fall so much is because I finally get to make large batches of soups and sauces. The options are endless and as long as you have the basics, it’s really up to your imagination of where you want to go with the spices and herbs.
Last weekend, I decided to whip up a batch of cream of tomato soup. I was going to make a bisque but chose to add cheese at the end instead. You may be wondering what the difference is between a soup, cream of and then a bisque.
Well, soup is your basic building block when you’re making a batch. You need stock (or broth) veggies or meat — in this case lots and lots of tomatoes — and then spices and herbs. From there you add heavy cream and it’s the amount you add that will result in your soup turning into a cream of or a bisque. Because I used cheddar cheese (yum) as a creamy thickener, I only used a small amount of cream. My recipe can be tweaked so that if you want it more bisque(y), please feel free to add more cream and less cheese.
Soups are perfect for experimenting with — you can always add more liquid if it’s too thick and visa versa. The longer the pot sits on the stove, the flavors marry and you have a more pronounced taste, but if you’re in a hurry, you could easily make a pot quickly and still make a quick, yummy batch on the go. Your options are endless and I welcome you to use my recipe as a base to explore flavors in your own kitchen. Follow the recipe the first time and then add spices from your cupboard the next time like oregano, garlic or onion powder then veggies such as fennel, peppers and shallots would also be delicious additions.
There is one step that I do for my recipe that you may not see in other recipes which is take the tomato skins off. I do this because the consistency is smoother without the tomato skins in the soup, and because if you keep the skins in a soup, sometimes the soup is stringy. And there is no canned product in this recipe, so there’s nothing to mask the natural beauty of the tomato. But don’t worry, I have step-by-step easy instructions for this yummy soup.
I’d love to hear your take on my recipe, whether you make it into a bisque or if you like it cheesy like I do. Just as a heads up, the amount of cheese to tomatoes and cream is a perfect amount so don’t be overwhelmed that it’ll turn out to be mac-n-cheese tomato soup. I promise you it won’t!
I hope you enjoy the soup and fall weather and as always, live zestier!
Fresh and Creamy Tomato Soup
INGREDIENTS
4 pounds of tomatoes (mix and match your favorite kinds — house, heirloom, roma, cherry … the choice is yours!) *See first step for tomatoes but skip this step for cherry tomatoes*
1 large carrot, roughly chopped
1 medium sweet onion (1 ¼ cup), roughly chopped
⅓ cup fresh basil, roughly chopped (more for topping)
½ cup heavy cream
¼-½ cheddar cheese, shredded, not pre-packaged (start with ¼ cup, taste and add the other ¼ cup if you want it extra cheesy)
3 cups vegetable broth (low sodium if possible!)
3 cloves of garlic, minced
1 tablespoon extra virgin olive oil
2 teaspoons dry basil
1 teaspoon sugar
1 teaspoon black pepper (more to taste if needed)
½ teaspoon salt (more to taste if needed)
DIRECTIONS
*Bring a pot of of water to a rolling boil. Place a bowl of cold water next to the stove so it’s easy to do one step to the next. Rinse the tomatoes, remove stems and mark and shallow “X” at the bottom of the tomato (opposite of where the stem would be). Once the water is boiling, you can place 3-4 tomatoes at a time into the water (carefully) and when the “X” begins to open up — don’t boil longer than 30 seconds — quickly take the tomatoes out with a slotted spoon and place them into the bowl of cold water where you can peal the skin off.
In a large pot, simmer olive oil and only 1 teaspoon of dry basil on low heat for two minutes — this will start to infuse the oil and bring out the flavors more. Add the chopped onions and carrots and cook for an additional five minutes. Add garlic, other teaspoon of dry basil, salt and pepper, sugar and all the chopped tomatoes; stir until tomatoes are coated with veggies, herbs and spices. Slowly add the broth, bring the heat to medium and bring to boil.
Lower heat to medium-low, add fresh basil, stir and simmer for 30 minutes. When timer is up, blend until smooth — the easiest way to do this process is with an immersion blender (hand-held blender), but if you don’t have one, in small batches, carefully transfer the soup to a blender and blend until perfectly smooth.
Once smooth, with the heat on low, slowly stir in the cream and ¼ cup cheese. Taste and add salt and pepper if needed and the extra ¼ cup of cheese. Serve it immediately and garnish it with creme fraiche, fresh basil, cheddar cheese, chives, homemade croutons or just good ol’ out of a soup mug with a spoon!
I am a proud Californian — born, raised and have lived here the majority of my life, and I love my home state. I’ve been up and down the entire state and have seen gorgeous beaches, tall mountains capped with snow, ginormous redwoods, large cities and tiny towns, forever-seeming deserts — did I mention beaches?
I could go on and on about the Golden State, but what I really want to share with you about California that you may not know is that we are an agricultural mecca. While there are patches of agriculture across the state, much of it comes from Central California.
Actually, California not only provides the rest of the country with much of its produce, many cities across the state have made a name for themselves — Gilroy (in NorCal) is the garlic capital of the world; the Salinas Valley (also in NorCal) is the “salad bowl of the world” because it is one of the most productive agricultural regions in the world, producing lettuce, artichokes, strawberries, spinach, tomatoes, broccoli, cauliflower, among other produce; Castroville (in Monterey County) is the artichoke capital of the world; and Fallbrook (in San Diego) is the avocado capital of the world.
The humble Haas avocado is what we’re mostly known for — it’s our state fruit. Before the ban was lifted back in the ’90s (Mexico is [and was] the world’s largest producer of avocados), all the avocados in the United States came from California. Since I grew up in SoCal, I had them at my fingertips, but people back in New York or Florida weren’t as luck because avocados don’t grow year round. Now that the U.S. gets a large portion our supply from Mexico, as well as Peru, Columbia and even South Africa, we can now eat avocados almost year round.
Avocados have sky rocketed in popularity in the past couple of decades probably because now they’re easily accessible. They’re a superfood, full of vitamins and nutrients — not only do they taste good, but are good for you, too. Best of all, there’s so much you can do with avocados — salads, dips, spreads, guacamole (of course), smoothies, spring rolls, soups, mousse and because I am from California, you can even do — avocado margaritas!
Haas avocados (the most common found in stores) are easy to identify by their distinct oval shape and dark green outer shells. Personally, I love avocados because the texture is rich, melt in your mouth, yet the flavor is so subtle and mild. You can brighten up so many dishes with avocados and from savory to sweet dishes, your possibilities are left to your imagination.
I took the ever-so-popular guacamole and put a spin on it, creating the GuacaBLT. See, I love BLTs and guacamole is up there on my list so I put the two together. This dip is great on nachos, tacos, burritos and you guessed it — put it on your next BLT sandwhich.
Live zestier.
GuacaBLT
INGREDIENTS
4 thick pieces of bacon, cooked, diced small (or crumbled)
2 ripe Haas avocados
1/4 cup lettuce sliced into 1/4″ strips
2 tablespoons tomatoes, diced small
2 teaspoons cilantro, chopped fine
2 teaspoons green onions, chopped small
2 teaspoons grapefruit vinegar **
1 lime, juiced
Black pepper and Kosher salt
DIRECTIONS
Cut the avocados in half, remove the pits and scoop out the flesh and into a medium bowl. Add the lime juice and mash with a fork, leaving the avocados chunky. Add the bacon, tomatoes, lettuce, cilantro, green onions and vinegar and mix gently. Add salt and pepper to taste.
Refrigerate for 15 minutes before serving.
** As I’ve raved in previous blogs, I can’t get enough of fruit-flavored balsamic vinegars. In this recipe, I used a grapefruit balsamic vinegar, but don’t worry, if you haven’t ordered a bottle or found one at your local store, just add lime juice. Start with the lime juice that’s already in the recipe and then add a teaspoon at a time to your taste. Enjoy.
Kids of all ages are on summer break; families are on vacation; and I just went and saw “Independence Day: Resurgence” — the sequel 20 years in the making (yes, I’m that “old” as my little brothers remind me all the time). It must be Fourth of July weekend!
When it comes to the Fourth, we all have traditions that we were raised on or that we like to do as adults: whether it’s going to the local Native American Indian Reservation to shoot off fireworks while watching the extravagant fireworks show (I was introduced to this tradition while up in the Pacific Northwest), or sitting on an overpass in SoCal in the perfect spot while catching a dozen major firework shows (I may have done this as a young adult a time or two), or gathering your buddies for a big barbeque and having some laughs.
Speaking of traditions, when I was a kid, I usually got to pick any kind of cake I wanted my mom to make for my birthday, and there was this pie that I’d ask her to make sometimes. It reminds me of a not-so-rich cheesecake but just as yummy!
My mom just came to visit me for my birthday, and just like I did as a kid, I asked for the special birthday pie. The recipe has been around as long as I can remember, but we have no idea where it originated.
I was inspired to zest it up and make it my own. Personally, I’m not usually a baker, but that’s why this is so perfect — there’s no baking involved! Plus, it only takes a few minutes to prepare. And of course, I had to decorate the pie in red, white and blue for the patriotic holiday.
I hope you enjoy this simple but delicious bit of my past.
Have a safe holiday weekend, and as always, happy zesty eating!
Red, White & Blue Cream Cheese Pie
INGREDIENTS
1 8-ounce package cream cheese, softened
3 medium lemons, juiced (1/3 cup)
1 14-ounce can sweetened condensed milk
1 9-inch graham cracker crumb pie crust
2 teaspoons fresh mint, finely chopped
1 teaspoon vanilla extract
1/2 teaspoon lime zest (about 1 medium lime)
Fresh berries: strawberries (my favorite), blueberries, raspberries, blackberries — pick your favorite berries to top the pie.
DIRECTIONS
Using a mixer, in a medium bowl, blend the cream cheese for about 30 seconds on medium speed. Slowly add the condensed milk, lemon juice and vanilla extract and continue mixing for 2-3 minutes or until smooth.
Gently fold in mint and lime zest.
Pour mixture into pie crust and refrigerate for 4 hours or until firmly set. Add fresh berries, slice and serve.
My dad is a very simple guy, so when Father’s Day rolls around, give him a bottle of diet Mountain Dew, sunflower seeds or popcorn, his favorite TV show and some peace and quiet, and he’s a very happy man on Father’s Day.
Other dads want big barbecues with plenty of steaks and burgers, along with all the fixings. This year, the last day of the NBA Finals falls on their special day — coincidence? I think not.
When I worked out in Florida many lifetimes ago (it seems like), I worked at a resort and at a sports bar. One of the dishes that I learned how to prepare at both restaurants was chicken wings, but two different preparations — fried and baked. At the sports bar, I was making endless fried wings with whatever sauce the guest could come up with and at the resort, we made baked jerk wings. I’m took a little bit of what I learned and went way left field with it. Boy, would my bosses be proud!
For my wings recipe, I decided to go with the baking process — mainly, because it’s healthier than fried wings (and just as yummy), and I wanted to keep the kitchen semi-clean for once (you can imagine how a kitchen looks when someone is working on a cookbook).
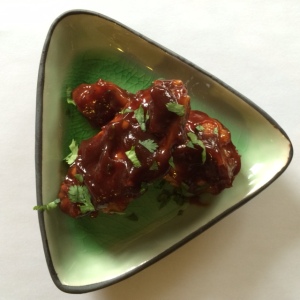
And I love barbecue, so I thought I’d bring the best of both worlds, creating baked chicken wings with a sweet and tangy bbq sauce, using an infused balsamic vinegar (raspberry was my choice, but you get to pick your flavor), and a whisky buffalo sauce because who doesn’t love whiskey?
Whether you like wings drenched in sauce (like me), plain wings and don’t get me started on that good ol’ debate on which sauce to dip those wings in — my ranch is so yummy even though I know there are some of you who love that blue cheese, too — make sure to give your dads a hug and happy zesty eating!
Sweet & Tangy BBQ Wings
Wings: (Use this method with both of the following wing recipes.)
1 dozen chicken wings, halved, with the tips removed and discarded (unless you’re saving them for a future chicken stock)
DIRECTIONS
Preheat the oven to 400 F. Lay out all the wings in a single layer on a baking sheet and pat dry (this will help keep the wings crispy). Drizzle a little extra virgin olive oil on both sides (not too much), and sprinkle both sides with kosher salt and black pepper.
Stick the wings in the oven for 35-40 minutes (depending on if you like them extra crispy like I do), flipping them halfway through the cooking time.
Sauce:
1 cup ketchup
2 tablespoon balsamic vinegar (use your favorite infused — I used raspberry)
2 tablespoon dark brown sugar
2 tablespoon Worcesteshire sauce
1 teaspoon fresh garlic, finely minced
1/2 teaspoon ground mustard
1/2 teaspoon kosher salt
1/2 teaspoon black pepper
DIRECTIONS
In a small saucepan, combine all ingredients (except for the balsamic vinegar) and heat on medium-low heat until it begins to boil. Turn off heat and stir in the balsamic.
Transfer to a bowl and toss with wings. Serve and enjoy.
Whiskey Buffalo Wings (sauce on side)
Sauce:
INGREDIENTS
1/4 cup unsalted butter
1/4-1/3 cup hot sauce (use your favorite)
2-3 tablespoons whiskey (again, your favorite)
1/2 lemon, juice
1/4-1/2 teaspoon cayenne pepper
DIRECTIONS
In a small saucepan, add all ingredients and heat on medium-low heat until low boil. Transfer to bowl and toss with wings. Serve and enjoy.
**Pro tip: When alcohol is added to a dish, it burns off once it is brought to a boiling point. We add it to recipes for taste. The sauce is just as good without it if you don’t like alcohol or you have kids and are wanting to be extra cautious. Also, if you do like alcohol and want to “taste” it in the sauce a little more, add it half-way in the cooking process instead of the beginning.
I love random unbirthday gifts in the middle of the week. And I received one in the mail — a bottle of delicious ruby red grapefruit white balsamic vinegar (say that 10 times fast) — last week that I’ve been using in some new recipes.
There are quite a few vinegars that are probably in your kitchen — dark balsamic, apple cider, white distilled, red wine, rice and maybe even champagne vinegar, but is there a bottle of white balsamic or have you ever even heard of it? My aunt had never heard of white balsamic until I was going on and on about my new bottle of happiness, which got me thinking … maybe people don’t realize that the not-so-hidden treasure is even out there, so I’m going to tell you a little about it and why I enjoy white balsamic so much.
Balsamic vinegar, like all good things aged (AKA, wine) originated in Italy way back in the day, and much like wine, it’s all about the aging process. Both white and dark balsamic vinegars are made from the juice “must” of Trebbiano grapes. The juice is pressed and boiled until a syrupy consistency and placed into different wood barrels that give the vinegars character and build on the flavor as it’s aged for 12-plus years.
The white balsamic is put into new wood barrels that haven’t been fired on the inside — which the dark balsamics have — because you don’t want the white to change color (think of wine … wine is aged in barrels almost the same way). White balsamic is going to have a cleaner, lighter, more elegant feel to it and be a little more acidic than the dark balsamic, and to me, the dark balsamic is a little richer and fruitier with a thicker consistency.
Both balsamic vinegars make delicious dressings and marinades and the whites can be added to summer salads and the dark can be added to sautéed veggies … I could go on and on.
Bottom line: I highly recommend ordering one of these infused vinegars from Nan’s Gourmet Foods — they were the kind senders of my unbirthday gift last week —or find an oil and vinegar store near you and play around in your kitchen. Don’t be afraid to try new things. My advice is to start by making a simple dressing and go from there, but definitely add white balsamic vinegar to your collection. Go easy to start — add it at the end of your dish; start with a smaller amount than what you think you’ll need; and you can always add more if you need to in the end.
I will be publishing a BLT-amole recipe very soon, which will have a white balsamic in the recipe, so keep an eye out for it. Don’t forget to try my summer salad, which uses a raspberry balsamic in the dressing.
Right now we’re in the middle of a long weekend. Woohoo! Time for busting out those dusty grills for barbecuing, gassing up the cars for a weekend-long road trip, or just a nice staycation with a beer in one hand and a remote control in the other.
But aside from the grilling, the socializing and the drinking, this weekend is really about remembering our troops. It is, however, Memorial Day weekend.
The difference between Memorial Day and Veterans Day — which is in November this year — is that this Monday we remember our men and women who we lost when they were serving our country. Veterans Day is a day set aside to thank our troops for their service. My dad was in the Navy for 20 years, and I was very lucky and blessed to have never lost him. He retired the year I graduated high school.
The cool thing about having a long weekend for most of us (not those who are in the newspaper, retail or restaurant industry — sorry, peeps!) is that we get to sit around and have good food, company and laughs!
I created a quick and easy potato salad to go with your barbecue or to just chow down at the kitchen counter like I did (shh, no judging!!). I was inspired while walking around in a local vegetable stand that had a little bit of everything and totally reminded me of my days in Santa Cruz.
Anywho … I found these adorable fingerling potatoes and there my brain went in the direction of a salad made with Greek yogurt. Sure, why not? You should also try out my summer salad with berry delish vinegrette.
I hope you enjoy! Don’t forget while you have the day off Monday, to take time to give family and loved ones an extra hug and remember our troops.
Happy zesty eating!
It’sAllGreektoMePotatoSalad
Forsalad:
INGREDIENTS
2 pounds little red fingerling potatoes, washed (not peeled) and diced into roughly 1/2-inch cubes (about 5 cups)
1 cup grape tomatoes, diced into roughly 1/2-inch cubes
3/4 tsp salt (1/2 tsp for boiling potatoes, 1/4 tsp for dressing)
1/2 cup red onion, brunoise cut (approximately 1/8-inch dice)
1/2 cup baby kosher dill pickles, sliced in thin rounds
Fordressing:
1 tsp fresh dill
2 tsp fresh parsley
1 tsp green onions
1/3 cup Greek nonfat yogurt
1/3 cup mayonnaise
1 tsp Dijon mustard
1/2 lemon, juice and zest
Pinch of black pepper
DIRECTIONS
Boil water for potatoes with 1/4 tsp salt. Cook potatoes on medium-high heat for 8-10 minutes or until tender.
Mix yogurt, mayo and Dijon in a smallish bowl. Then add in dill, parsley, green onions, pinch of pepper and the salt. Dressing is best if chilled for about 30 minutes before adding to salad.
Mix potatoes, red onions, pickles and tomatoes in a large bowl. Add 1/3-1/2 cup of dressing (depending on the moisture level you like for your salad) to the potato mixture; stir until everything is fully blended.


 My favorite season is fall. The leaves are changing to reds, oranges and yellows so taking random weekend drives are even more gorgeous than any other time of the year. Finally, the weather is cooling down when you’re living in hot climates, which I’ve done as an adult (not fun). And my cats finally stop shedding, so that’s a bonus.
 I am a proud Californian — born, raised and have lived here the majority of my life, and I love my home state. I’ve been up and down the entire state and have seen gorgeous beaches, tall mountains capped with snow, ginormous redwoods, large cities and tiny towns, forever-seeming deserts — did I mention beaches?
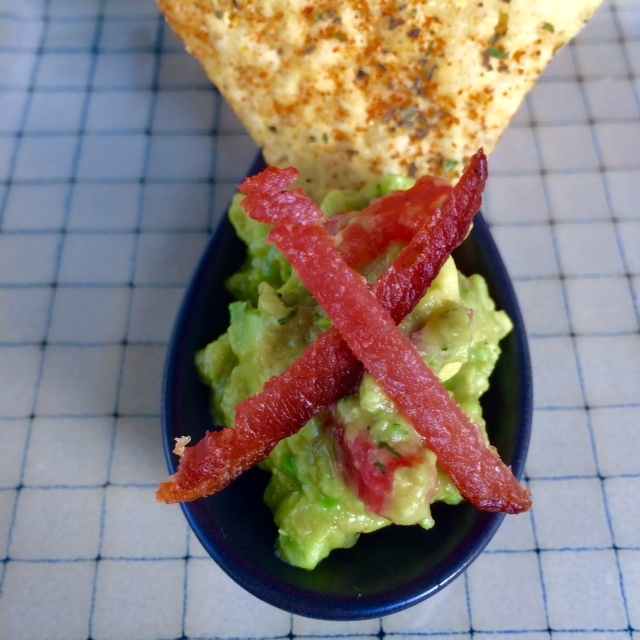
 Kids of all ages are on summer break; families are on vacation; and I just went and saw “Independence Day: Resurgence” — the sequel 20 years in the making (yes, I’m that “old” as my little brothers remind me all the time). It must be Fourth of July weekend!


 Right now we’re in the middle of a long weekend. Woohoo! Time for busting out those dusty grills for barbecuing, gassing up the cars for a weekend-long road trip, or just a nice staycation with a beer in one hand and a remote control in the other.
 2 pounds little red fingerling potatoes, washed (not peeled) and diced into roughly 1/2-inch cubes (about 5 cups)
 1 tsp fresh dill